

Now Reading: Migrate from HTTP to HTTPS: Complete Step-by-Step Guide for SEO-Safe Migration
-
01
Migrate from HTTP to HTTPS: Complete Step-by-Step Guide for SEO-Safe Migration

Migrating from HTTP to HTTPS is essential for security and SEO, but a poorly executed transition can cause ranking drops. This step-by-step guide explains how to move safely, implement redirects correctly, and protect your search visibility during the migration process.
Introduction: Migrate from HTTP to HTTPS
Migrating your website from HTTP to HTTPS is no longer optional.
Search engines prefer secure websites, and users expect to see the padlock icon in their browser. Google officially confirmed HTTPS as a ranking signal in its announcement on HTTPS as a ranking signal.
HTTPS encrypts data between your website and users, protecting sensitive information from interception. Cloudflare explains how this secure protocol works in its guide on What is HTTPS.
Beyond security, HTTPS improves trust. Modern browsers like Chrome flag non-secure pages, as noted in Google Chrome’s security updates. That warning alone can reduce conversions and credibility.
From an SEO perspective, Google treats protocol changes as a site move. Its documentation on site moves with URL changes explains that URLs must be re-crawled and reprocessed. If migration is handled incorrectly, temporary ranking fluctuations can occur.
If you are launching a new site, platforms like WordPress provide official guidance on enabling HTTPS in their resource on HTTPS for WordPress. Many hosting providers now offer free SSL certificates via Let’s Encrypt, making secure implementation easier than ever.
Migrating from HTTP to HTTPS is not just a technical upgrade.
It is a strategic move to protect rankings, strengthen trust, and future-proof your digital presence.
What is HTTPS and How It Works
HTTPS stands for Hypertext Transfer Protocol Secure.
It is the secure version of HTTP.
Unlike HTTP, HTTPS encrypts data using SSL or TLS protocols so information shared between a browser and server cannot be intercepted. Cloudflare explains this clearly in its guide on What is HTTPS.
HTTPS works through three core functions:
-
Encryption – Data is scrambled so attackers cannot read it.
-
Authentication – SSL certificates verify the website’s identity. DigiCert explains this in How SSL Certificates Work.
-
Data Integrity – Information cannot be modified during transmission.
When users see the padlock icon in their browser, it confirms these protections are active.
HTTPS protects user data, builds trust, and strengthens your website’s credibility.
Why You Should Migrate from HTTP to HTTPS
Migrating from HTTP to HTTPS is no longer just a technical recommendation.
It is a competitive necessity.
HTTPS strengthens security, improves search visibility, builds user trust, and supports regulatory compliance. In a digital environment where credibility and data protection matter, staying on HTTP puts your website at risk.
Here are the core reasons to migrate from HTTP to HTTPS.
1. SEO Benefits
Google has confirmed that HTTPS is a ranking signal, as outlined in its official post on HTTPS as a ranking signal.
Secure websites are crawled and indexed more reliably. Google Search Central also emphasizes secure browsing as part of its quality guidelines.
HTTPS also contributes to better performance and user experience signals, which indirectly influence Core Web Vitals and overall ranking performance. Google explains performance expectations in its Core Web Vitals documentation.
Without HTTPS, your rankings may gradually weaken over time.
2. Security Benefits
HTTPS encrypts user data, making it significantly harder for attackers to intercept information. Cloudflare explains this protection in its overview of How HTTPS Works.
It also protects against man-in-the-middle attacks and prevents data tampering during transmission.
Most importantly, HTTPS verifies your server identity through SSL/TLS certificates, ensuring users are not redirected to malicious or spoofed versions of your website.
In short, HTTPS protects both you and your users.
3. Trust and User Experience
Modern browsers flag HTTP sites as “Not Secure.” Google Chrome’s security updates explain how unsecured sites trigger warnings in the browser interface.
When users see the padlock icon, it builds immediate credibility.
When they see a security warning, trust drops instantly.
Secure websites experience higher engagement, better form submissions, and improved conversion rates simply because users feel safe interacting with them.
4. Compliance and Legal Requirements
HTTPS is essential for compliance with global regulations.
Data protection laws such as GDPR require organizations to implement appropriate security measures.
If you handle healthcare data, HIPAA security rules apply.
If you process online payments, PCI DSS compliance mandates secure transmission of cardholder data.
Operating without HTTPS can create legal exposure and financial penalties.
The Strategic Reality
Migrating from HTTP to HTTPS is not just about encryption.
It improves SEO.
It strengthens security.
It builds trust.
It ensures compliance.
In today’s digital ecosystem, HTTPS is the baseline standard for any serious website.
Types of SSL Certificates
Before migrating from HTTP to HTTPS, you must choose the right SSL certificate.
The type of SSL certificate you select determines the level of validation, trust, and security your website provides. DigiCert explains the differences clearly in its guide to Types of SSL Certificates.
Here are the main types:
1. Domain Validated (DV)
This is the quickest and simplest option. It verifies domain ownership only. Suitable for blogs, portfolios, and small websites.
2. Organization Validated (OV)
This certificate verifies both the domain and the organization behind it. It adds more credibility and is suitable for business websites.
3. Extended Validation (EV)
This provides the highest level of validation. It displays verified company details and is commonly used by eCommerce, finance, and enterprise platforms.
4. Wildcard SSL
This secures a primary domain and all its subdomains under one certificate. Helpful for websites with multiple subdomains.
5. Multi-Domain SSL (SAN)
This allows multiple different domain names to be secured under a single certificate. Ideal for companies managing several domains.
Choosing the correct SSL certificate ensures a smooth HTTPS migration while aligning with your business goals and trust requirements.
How to Get an SSL Certificate
To migrate from HTTP to HTTPS, you first need an SSL certificate.
You can obtain one for free or purchase a paid certificate, depending on your security and validation requirements.
1. Free SSL Options
If you run a blog, startup site, or informational website, free SSL may be sufficient.
Let’s Encrypt provides free Domain Validated (DV) certificates and is supported by most hosting providers. Many hosts enable automatic renewal, making it a low-maintenance option.
If you use a CDN, Cloudflare offers free Universal SSL for websites connected to its network.
Free SSL certificates are ideal for basic encryption needs.
2. Paid SSL Options
For businesses, eCommerce stores, or enterprises, paid SSL certificates provide additional validation and support.
Trusted providers such as DigiCert, Sectigo (formerly Comodo), and GeoTrust offer Domain Validated (DV), Organization Validated (OV), and Extended Validation (EV) certificates.
Paid certificates often include:
-
Higher warranty coverage
-
Business identity validation
-
Dedicated technical support
-
Stronger trust indicators
Many hosting providers also offer one-click SSL installation within their dashboard.
Before purchasing, check whether your hosting plan already includes free SSL. Many modern hosting services bundle Let’s Encrypt certificates at no additional cost.
If you select the right SSL certificate then you will feel a smooth HTTPS migration.
Pre-Migration Checklist
Migrating from HTTP to HTTPS requires preparation.
Installing an SSL certificate alone is not enough.
A structured pre-migration checklist helps prevent ranking drops, broken links, and tracking issues. Google also advises careful planning during site moves in its documentation on site migrations.
Before switching to HTTPS, complete these steps:
1. Backup Your Website
Create a full backup of website files and databases. This ensures you can restore your site quickly if anything goes wrong during migration.
2. Update CMS, Plugins, and Themes
Update your CMS such as WordPress, along with all plugins and themes. Outdated components may create compatibility issues after enabling HTTPS.
3. Audit Internal Links and Media Paths
Check all internal links, images, scripts, and media URLs. Hardcoded HTTP links can cause mixed content errors after migration.
4. Review Third-Party Scripts and Integrations
List all external tools connected to your site, including analytics, payment gateways, tracking pixels, and CDN services. Ensure each supports HTTPS.
Proper preparation reduces technical risk.
Step-by-Step Guide to Migrate to HTTPS
Migrating from HTTP to HTTPS must be handled carefully.
Each step ensures security, SEO stability, and a smooth user experience. Google treats HTTPS migration as a site move, as explained in its guide on site moves with URL changes.
Follow these steps in order.
1. Install the SSL Certificate
Install your SSL certificate through your hosting control panel such as cPanel or Plesk. Many hosts offer one-click SSL activation.
If you are using Let’s Encrypt, you can generate and install a free certificate via Let’s Encrypt or directly through your hosting dashboard.
After installation, visit your website using https:// and confirm that the padlock icon appears.
This confirms encryption is active.
2. Update Website URLs
Next, update all HTTP references to HTTPS.
This includes:
-
CMS settings (site URL and home URL)
-
Internal links and navigation menus
-
Images, scripts, and stylesheets
-
Database URLs
Failure to update resources may cause mixed content errors. You can test for these issues using tools like Why No Padlock.
Consistency is critical.
3. Set Up 301 Redirects
Implement 301 permanent redirects from HTTP to HTTPS.
This ensures:
-
Users are automatically redirected
-
SEO equity is preserved
-
Duplicate content issues are avoided
Permanent redirects signal to search engines that the secure version is now the canonical version.
4. Enable HSTS (Optional but Recommended)
HTTP Strict Transport Security (HSTS) forces browsers to access your site only via HTTPS.
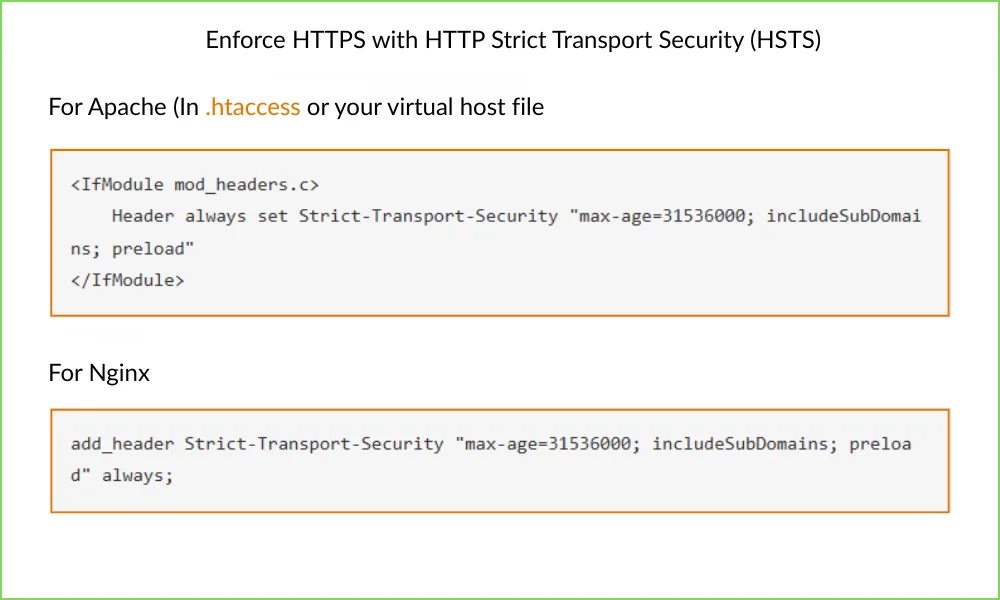
It prevents protocol downgrade attacks and strengthens security.
Before enabling HSTS, ensure your HTTPS configuration is fully functional across all subdomains. You can learn more about HSTS at hstspreload.org.
5. Update External Services
Update all third-party tools with your new HTTPS URL.
This includes:
-
Adding and verifying the HTTPS property in Google Search Console
-
Updating website settings in Google Analytics
-
Reconfiguring CDN settings such as Cloudflare
-
Updating URLs in social media bios, email templates, paid ads, and marketing automation tools
External services depend on correct URL configuration.
Updating them ensures clean tracking, accurate reporting, and consistent performance.
6. Update Sitemap and Robots.txt
Regenerate your XML sitemap with HTTPS URLs only.
Submit the updated sitemap in Google Search Console to accelerate re-indexing. Google explains sitemap best practices in its sitemap documentation.
Also confirm your robots.txt file references the HTTPS sitemap and does not block secure URLs.
Search engines rely on these files for crawling and indexing guidance.
7. Test Everything Thoroughly
Testing protects your rankings.
After migration:
-
Verify SSL installation using tools like SSL Labs Server Test
-
Check for mixed content warnings in browser developer tools
-
Confirm all HTTP URLs properly redirect with 301 status codes
-
Test across different browsers and devices
If errors appear, address them immediately to avoid security warnings or crawl issues.
8. Special Step for WordPress Users
If you use WordPress, update your site URLs inside the dashboard.
Go to Settings → General and change both:
-
WordPress Address (URL)
-
Site Address (URL)
from http:// to https://.
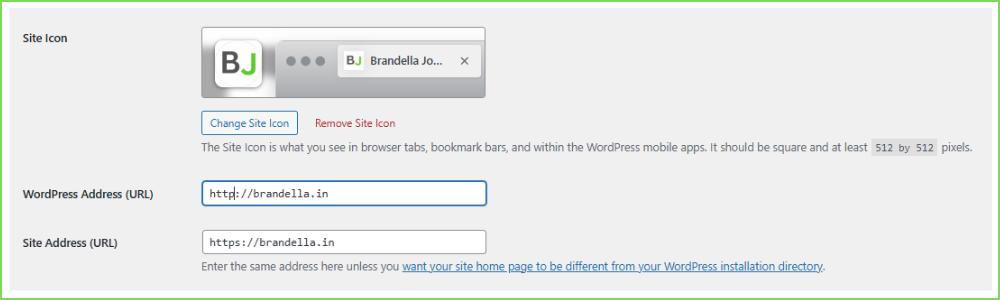
After saving, you may be logged out and asked to log in again via HTTPS.
This step ensures WordPress generates secure internal URLs across themes, plugins, and media files.
Post-Migration Steps
Once HTTPS is live and tested, complete these final checks to protect your SEO and stability.
1. Re-Submit to Search Engines
Verify and submit your HTTPS property in Google Search Console and update it in Bing Webmaster Tools.
Resubmit your updated HTTPS sitemap.
2. Monitor Performance
Track organic traffic, keyword rankings, and crawl reports.
Short-term fluctuations are normal during re-indexing.
3. Fix Errors Quickly
Check for 404 pages, redirect issues, and mixed content warnings.
Resolve them immediately to prevent ranking impact.
4. Maintain HTTPS Everywhere
Use HTTPS consistently across internal links, marketing materials, ads, and social profiles.
Migration is complete only when monitoring is ongoing.
Thank you for reading! Please share/repost if found useful.


AI Music Generator
I didn’t realize how much a rushed or poorly managed HTTPS migration could impact search rankings. The guide’s focus on careful planning and step-by-step execution really highlights what’s important for keeping SEO intact. Definitely makes the process feel more approachable and less risky.
seedream
Thanks for walking through the HTTPS migration process step-by-step—especially helpful to see how proper redirect setup and canonical tags can prevent SEO headaches. I’ve actually been meaning to tackle this on a few of our older sites, so your guide came at a perfect time. The part about monitoring crawl errors post-migration is a great reminder that it’s not just about the switch, but the follow-up too.